Ref :
- fb before start. About 2hrs long. The tutor has some accent but his dictation is very clear to follow. The other volumes cost several dollars.
- introduction
This is the first course in the series Mastering Nuke: Your First Shot. In this course, you will learn how to assemble and finalize a full CG shot and through the process, you will discover the powerful tools of Nuke and its interface. No previous experience or knowledge is required. Every step is carefully commented and explained with the goal to make you a compositor in just a few hours.
The author is Florian Girardot, a senior visual effect artist specialized in Compositing who has been working in the movie industry for more than 10 years. Some of his recent projects include Deadpool 2, Detective Pikachu and Spiderman Far From Home among others.
This course has been designed for beginners, or for people who don’t do compositing very often, and in general for people who would like to learn how to create visual effects like the ones we see in major Hollywood productions.
This entire curriculum is based on the author’s both professional and teaching experience. In the author’s own words:
I believe in practice to understand and learn concepts, so each course in the series will be based on a concrete shot example. On the top of learning new techniques and achieving something real, you’ll be able to use the shots you’ve done in your demo-reel!
I’m very excited to tell you that, at the end of this series, you’ll have the knowledge and skills to work on feature film quality shots.
- Some of the things you’ll learn:
- Understand the Nuke interface -Discover the logic of nodal compositing -Assemble render layers with the merge nodes -Discover some of the most important nodes and effects -The basic of color correction in Nuke -Understand Channels, Alpha, AOVs
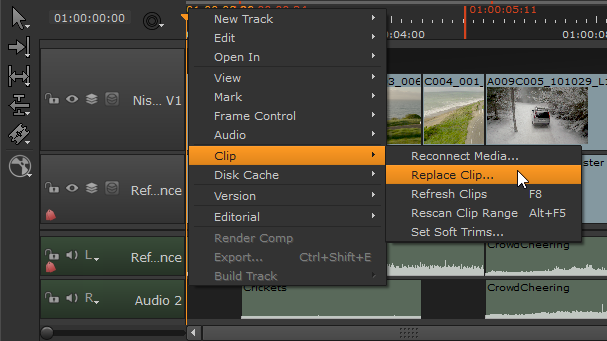
Though all four options deal with reloading shots, each has a particular use dependent on context:
- Reconnect Media - allows you to redirect the file path when the source file location changes.
- Replace Clip - replaces the selected shot with a specified source clip. Nuke Studio assumes that any source clip you choose is acceptable, regardless of timecode.
- Refresh Clips (F8) - allows you to reload the shot when the source file location has not changed, such as when work has been done on the clip offline. Selecting refresh only refreshes the clip’s current frame range.
- Rescan Clip Range (Alt+F5) - similar to Refresh Clips, above, but rescan also checks for additional frames that may have been added to the source file and adds them to the shot’s frame range.
- Set Soft Trims - sets the files handles on the selected clip(s). See Setting Soft Trims for more information.
- Course Introduction1m 32s
- viewer
- timeline
- play button
- node graph
- tool bar
- properties ; display all the control
- Node graph5m 45s
- each node has a function
- color bars show color bars
- blur is to blur
- color correct for color correction
- in ae there are layers but in nuke there are group of nodes
- each has pros and cons
- four ways to make node
- use a toolbar ; icon
- color correct ; c ;
- right click to choose
- defocus
- tab key to type
- transform ; select ; enter
- by using short cut
- t for transform
- b for blur
- you can check the short cut keys from each
- g for grade
- c for color correct
- you will find your habit
- use a toolbar ; icon
- to connect node
- drag the arrow
- alt + lmb
- or scroll to zoom in zoom out
- Import an image sequence4m 16s
- r ; read node ; go and find your file ; better to make src file on the side
- images with sequence are combined
- click sequences to make sequence or separate
- another way to read right click ; image ; read
- choose black arrorw to see the preview image / even have timeline for the animation
- third way ; tab key
- fourth ; click from toolbar
- fifth ; drag drop total file or each image.
- you don’t have to choose each single file
- The viewer panel5m 49s
- click node and use number key to view
-
- orange color means they gain cachetime line
- you can click each buttons
- orange color means they gain cachetime line

- upper left is a gain ; right is gamma
    -   it doesn’t affect your comp result

    -   **control alt click ; shortcut for resetting color parmeters**

    -   rgba ; multi layers

    -   rgba.alpha / rgb / sRGB(luts)

    -   proxy ; toggle ; usually lighter version / lower resolution ; faster to work on proxy mode

    -   a - option - b

        -   wipe option ; try it all for more ; good for comparison

- b ; choose each read to connect- Project settings and homework3m 10s
- s; project setting ; frame range
- +t tutor says nuke goes weird sometimes but ; if your load longer frame range sequence it will take over the project setting frame range so double check.
- The merge node2m 56s
- how to assemble different nodes
- merge sky and earth ; use merge b ; behind a ; front
- Fusion modes and mix attribute5m 44s

- he connected all the light exr with merge ; plus and later when he combined lights to other background and earth / aircraft he used over mode.
- one light node can have double merge node to use plus / under fusion mode of merge
- and change ; mix less to control intensity of the effect.
- ; how to use fusion mode
- Multipass EXR compositing9m 3s
- channel ; r -g-b-a ; also work with shortcut keys
- r works as read so hover to viewport to control rgba
- rgb ; layer is consist with red - green - blue channel and ; alpha
- you can check this in the rgb menu.

- modify grade ; channels to alpha you can see more transparency on the image
- exr extension ; it can carry mutiple layers
- ; green box means there are more than one layer in the exr.

- ; green box means there are more than one layer in the exr.
- rgba ; this name is a bit confusing but
-

- in the rgba you can check the layer in the exr files.
- you can click to check each layer


- select LayerContactSheet
- then it will show the layers inside the exr
- 5 layer with rba - filllight - emission - keylight - rimlight
- main comp will deal with rgba in the conclusion
-

- channel-shuffle snode ; you will see the emission

- and you can check one layer one by one
- rgba - filllight - emission … one by one


- 41:30 - CG breakdown8m 29sso change each shuffle node with selected in1 : with each layer and name the shuffle to the original layer name like emission / fill light /…
- emission - rim light ; 4 nodes
- connect this with original exr---------------------------click edit ; node ; Postage Stamp on / off ; alt p
- ; using postage stamp can extremely slow down the nuke especially w/merge node
- to see the preview image of the node

- _so the checked shuffle node will be changed like below ;

- and check the rgb’s ‘b’ node to blue and alpha


when you connect merge node, copy and paste this will automatically connect a arrow
but the best habit is connect previous node with a ; and b with the next node
so switch the arrow with ; shift x ; to swap

+
t why???_\: figure out later.. but i think it’s because of the back and the forth combination_ this tutor forget to put logical feedbacks very often. Sigh. some facts seems obvious but not for the starter. excuse you.
- we call group of nodes as ; “tree”
- he split the rgba channel with shuffle and connect it all over again to make sure we understand the rgba.
Uploaded by Notion2Tistory v1.1.0
----------------------------------------------------
-----------------------------------------------------
'sw > nuke' 카테고리의 다른 글
| nk008_mastering nuke vol 1-3 ; curve editor (0) | 2022.07.07 |
|---|---|
| nk007_mastering nuke vol 1-2 ; copy alpha, color correction, transform, reformat, animated keys control. (0) | 2022.07.06 |
| nk005_Introduction to Nuke for After Effects Artists (0) | 2022.06.29 |
| nuke004_ An Introduction to Nuke | Learning the Basics (1) | 2022.06.29 |
| nuke003_ hotkeys 02 (0) | 2022.06.28 |


